![]()
Leading rant:
Inspired by this post(read it because I am going to reference it) on the Wikitech mailing list I was inspired to write about Qt Creator, the IDE that I use for about an year now for almost any kind of C/C++ project and which I think it is pretty close to being a type 1 Integrated Development Environment, as written by Paul in that e-mail, which is a real and useful IDE, at least for my use cases. Qt Creator is a powerful and flexible IDE most useful for C/C++ code and especially when used in combination with the Qt SDK. However, due it's extreme flexibility, Qt Creator can be tweaked to work with almost any kind of C/C++ source project, from the default qmake project files to CMake, GNU Autotools(the GNU Build System), standalone Makefiles or even custom commands for direct access command line steps for direct compiler and linkage directives.
While I prefer type 2 IDE's for most of the day, which are powerful text editors like Vim for casual hacking or minor code modifications, which VIM excels at, especially with its modal mode, delving into an entirely unknown code base(especially a big one) or using new libraries and apis or for long coding sessions, in a simple text editor, even as powerfull as Vim or Emacs, things start to get inconvenient pretty easily and you will notice a slow down, mainly because of the poor code browsing, syntax highlighting(C++) and code completion capabilities that they posses. They are not to be blamed though and there's also nothing wrong with them, they are simply text editors and not IDE's. Since Vim is my favorite text editor, I tried various combinations of Ctags and CScope and all kinds of crazy hacks on top of that, just to be able to have code nagivation and code completion at least to some extent. You can find my Vimrc file in here, without Ctags and CScope, since that would make for entire post by its own.
However, I got tired of it after some time, especially because it doesn't work that nice with some of the crazy quirks that C++ for e.g. exhibits and because I have to keep the databases that those tools use up to date frequently and manually, for every project that I am working on. For terminal only access, coding like this is fine, to some extent, however, this seemed really overkill on my desktop, especially since I am running an X desktop with a GUI and knowing that I could do better to be more productive in 2011.
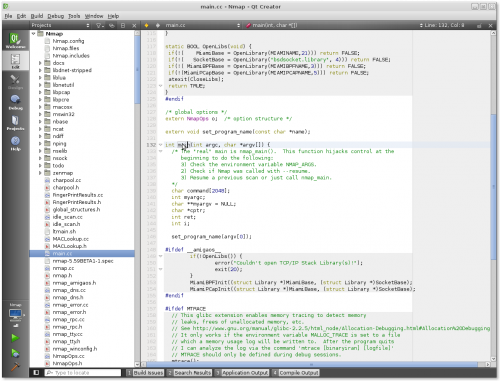
Ok, let's take a first look at how Qt Creator looks like in action, since I know I made you curious by now:
Now I'm going to list some of the strongest points and features that Qt Creator has and that I think make it stand out:
- Open Source - https://qt.gitorious.org/qt-creator
- Cross Platform - Works on Linux, Windows and Mac OS X like a charm
- Actively developed and improved
- Strong orientation and support for C/C++ native development
- Excellent syntax highlighting
- Magnificent code browsing and navigation in combination with useful and customizable keyboard shortcuts
- Great and generic(works with any file you include, it doesn't have to know anything special about it) code completion support
- Easily customizable and Extensible through plugins
- Support for integration with various Source Control Management tools like Git, Subversion, Bazaar, Mercurial, CVS and more.
- Debugger integration with both GDB and Microsoft's Debugging Tools for Windows through CDB (this one could use some improvement but it's still better the debugging from the command line)
- Custom configure, build, clean and deployment steps
- Integration with tools like Valgrind
- Per project settings
- Vim editing mode
- Code snippets
- A pretty fast IDE, even when indexing hundreds of files with hundreds of thousands lines of code for the first time
- Linux Man Pages context help integration - thanks to the flexible Qt Help System, this can be extended to almost any API
Although I only listed what I like the most on top of my head, Qt Creator has many cool and useful features and the only way to experience them all, is to start using it and you really should give it a spin, because as you can see, it's feature list is nothing close to short. You can find some videos that show you some of the features I described above in action on Youtube, but keep in mind that they are kind of old(around 2009) and Qt Creator has very much evolved a lot since then.
The how to:
Now let's get to the main purpose of this post, using Qt Creator with GNU Build System projects. A project that follows the GNU Build System usually is composed of a configure file and several other inputs(configure.ac, Makefile.am) that help in creating the Makefiles that will build the actual project on the target platform. The GNU Build System is, of course, much more then that, but for this tutorial, that's all you need to know and because these steps will also work for projects that have only the Makefiles for e.g.
Next I'm going to show you how easy it is to use Qt Creator with the Nmap security scanner based on the steps outlined below:
- Download and install Qt Creator from https://qt.nokia.com/downloads. At the time of writing this, I'm using Qt Creator 2.2.1. I'm going to assume you're going to be using Linux from now on, any distro should be fine as long as you are comfortable with it, however, I am using Debian(Squeeze). If you can't make up your mind, just use Ubuntu. For Mac OS X and Windows steps should be similar.
- Decide on a project to use. I'm going to use Nmap since that's what I'm working on currently and because it is the perfect example of a great open source project that's low level enough to illustrate system programming using Qt Creator. You can download the latest version tarball from https://nmap.org/download(nmap-5.59BETA1.tar.bz2 is fine). After deciding on a project, you should install all of the development dependencies(the toolchain) that your chosen project needs, like the right compiler, libraries and other tools you might need. For Nmap, for e.g., we will need gcc, openssl libraries, libpcap, perl, python, etc. If you're on a Debian like distribution(Debian, Ubuntu), luckily you can just do apt-get build-dep nmap and you get everything you need in one shot. If you do some tests builds from the command line, remember to clean the source tree before proceeding to the next steps, since you only want to add to the project only the base files and none of the auto generated files from the build system.
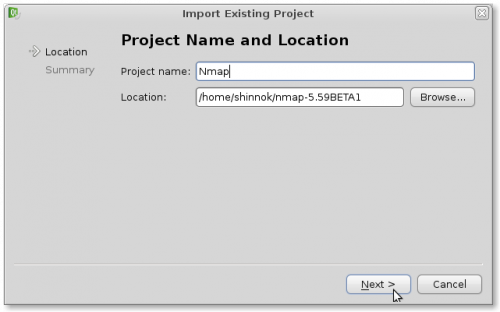
- Assuming you installed Qt Creator successfully, open it and go to File -> New File or Project -> Other Project and click on Import Existing Project. Advance to the next screen.
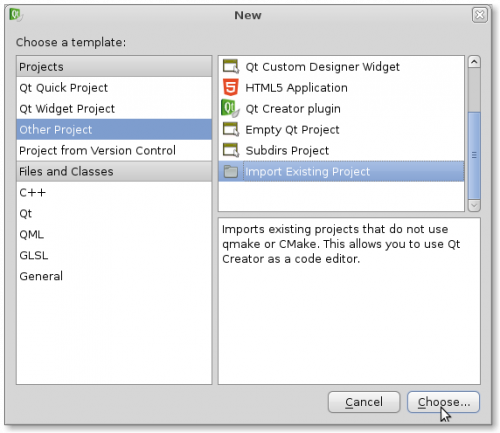
- In the current screen, give your project a name(that name will be used for your project files too so don't go crazy with spaces or special chars) and select the location to your project source tree. In the nmap example, Nmap is a good project name and for Location browse to the path where you extracted the nmap source archive. Click on Next.
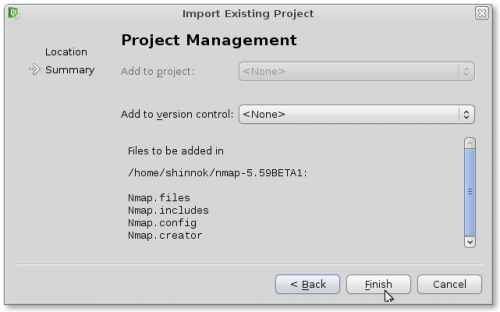
- The next screen, Project Management, is going to ask you if you want to use source control management(git, svn) for your project and if yes,then the project files will be the first to be added to the project. You should add these files to the scm repository only if you know that they would be usefull for others, otherwise you should keep them to your self, by using exclude directives like .gitignore files in git or svn:ignoreproperty in svn. For the Nmap case, the project files are:
- Nmap.config - Project configuration settings like predefined Macros
- Nmap.creator - Qt Creator settings
- Nmap.files - A listing of all the files included in the project
- Nmap.includes - Include directories
- Nmap.creator.user - This one is excluded from adding to svn since it stores per user project settings.
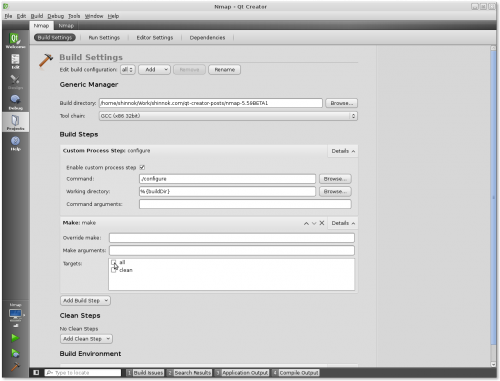
- Assuming everything went fine, you should now have your project open in Qt Creator and ready to proceed to project settings. On the left side of Qt Creator click on Projects. Right now you're looking at the Build Settings screen. This is where you set your project building and cleaning steps. For Nmap, the building process is made of the configure step and the make step. The clean process is made of the _make clean_step. Let's add these steps to the build settings:
- On the Build Steps section click on Add Build Step -> Custom Process Step. Click on Enable Custom Process Step checkbox and add the following command to the Command: text box: ./configure. Move this step to the top of the stack by clicking on the upper arrow that fades in when you hover the build step. This step, the configure process, can only be run once and then disabled, since you don't really need to run it again unless you run make distclean or modify the build system.
- Now expand the Make step and deselect the all checkbox in the Targets section. We don't need that argument for Nmap, since Nmap's Makefiles doesn't have an "all" target. Now all the make step will do is issuing the make command.
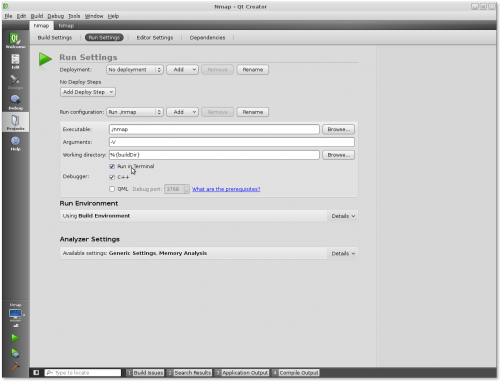
- Now let's proceed to the deployment steps, the Run Settings tab next to Build Settings, assuming that you would want to run Nmap in a basic form after a successful build just to know that everything runs smoothly. However for most cases, with tools like Nmap that have dozens of command line arguments you're better of with running from an external terminal window, instead of modifying the arguments all over again in Run Settings when you need them changed. For this case, we'll just want to run nmap with the version argument, ./nmap -V:
- Switch over to the Edit mode on the left sidebar and press Ctrl^Shift^s to save your changes and start Building by pressing Ctrl^b.
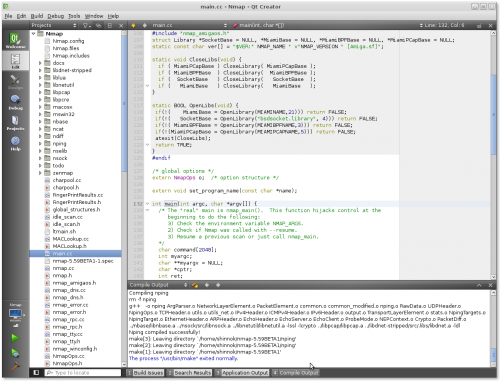
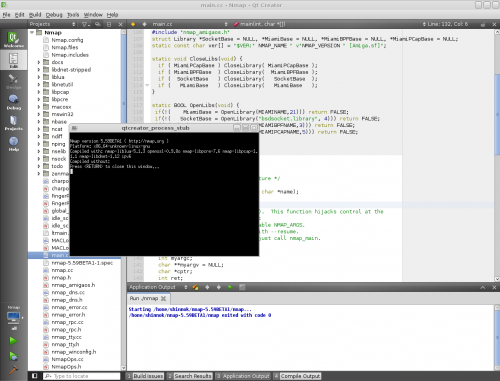
Wait for the build to finish and you are ready to run your executable by pressing Ctrl^r. In Nmap's case you should see a window popping with Nmap version output:
That's it! This is how simple it is to use Qt Creator with a project like Nmap, that has nothing to do with Qt or qmake whatsoever, all you need to do, is know a little bit about the specific project's build process and toolchain and describe them to Qt Creator as build steps.
I've been using this process on many non Qt projects like John the Ripper, skipfish, VCMI(Heroes 3 oss clone), GNU Coreutils and many more besides Nmap, of course, projects which are in both C and C++ and all I can say is that Qt Creator helped me a lot in the cases where a text editor didn't(and shouldn't try to) excel at. None of the other choices available as free and open source IDE's out there could match Qt Creator in my opinion and I really hope that the Creator will continue in the same manner it has so far, free and open source, cross-platform, actively developed and supported, flexible and not locked to the Qt framework. Here are other alternatives to Qt Creator that I've used in the paste and still use from time to time for specific certain tasks that they do well besides Qt Creator and adhere at least to the open source, cross-platform and good for native development rules: KDevelop, Code::Blocks, Anjuta and Geany (no, I'm not going to mention Eclipse and Netbeans since they are not that good for native programming).
All in all, Qt Creator is a great IDE for general C/C++ development and even if it can't currently beat the behemoth that is Visual Studio in certain aspects, it wouldn't even be fair to compare them until Visual Studio will strive for cross platform compatibility, multiple compilers and debuggers support or the ability to use multiple revision control systems.
Give it a spin, you won't regret.
